PCB Assembly
 Layer Buildup
 Online Tools
 PCB Design-Aid & Layout
 Mechanics
 SMD-Stencils
 Quality
 Drills & Throughplating
 Factory & Certificate
 PCB Assembly Factory Show
Certificate
PCB Assembly Factory Show
Certificate
Support Team
Feedback:
support@nextpcb.comThe Arduino Uno is essentially one of the most utilized microcontroller boards at an inexpensive price. It is an open-source electronics platform by which anyone is capable of using various kinds of electronic devices to design and develop different projects with low technical expertise. The Uno was first introduced in 2005 and is the flagship board of the Arduino platform that finds utility in electronics education and hobbyist projects.
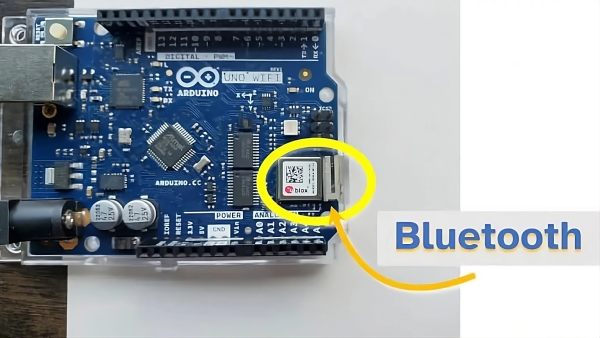
(The only official Arduino Uno with built-in Bluetooth is the Arduino Uno WiFi Rev2)
A frequently asked question new Arduino users ask is whether the Uno is already built-in with Bluetooth. Let me briefly answer your question in one sentence – if you are expecting Bluetooth to be built into the Arduino Uno, you will be disappointed. However, that does not mean it cannot communicate wirelessly: it simply means that the operative control of the mechanical connection is mandatory in this case. In this article, the reader will be introduced to Uno’s standard I/O communication interfaces and get a glimpse of some basic approaches to enable Bluetooth or WiFi.
Before looking at wireless add-ons, it is helpful to understand the communication protocols that the Arduino Uno natively supports. Out of the box, the board can communicate through four primary interfaces:
While the Uno lacks WiFi or Bluetooth out of the box, these communication protocols provide the foundation for adding wireless connectivity through external modules. Serial communication in particular enables interfacing peripherals like Bluetooth modules.
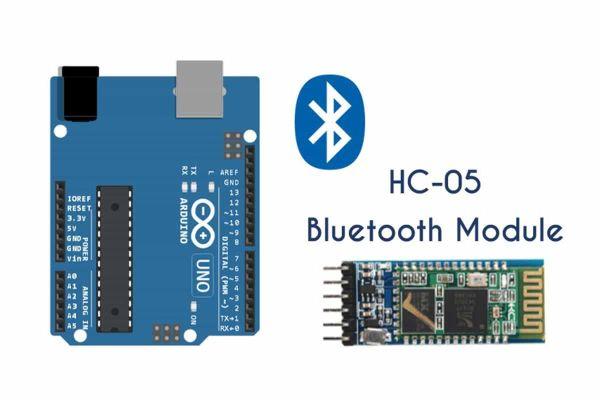
Integrating Bluetooth to an Arduino Uno is not a tough task and the easiest way is using Bluetooth serial. These usually come at a low cost and interface with other devices by transmitting data serially over Bluetooth using what is referred to as UART (Universal asynchronous receiver-transmitter).
Some popular Bluetooth module options for the Uno include:
All these modules connect to the Arduino Uno via the TX/RX pins and communicate serially over Bluetooth. Programming is done through AT commands sent from the Arduino IDE serial monitor or with a Bluetooth terminal app on a mobile device.
With a simple Bluetooth module wired up, the Arduino can wirelessly transmit sensor data, receive Bluetooth commands, or interface with Bluetooth devices like smartphones, tablets, or laptops from distances of up to 30-100 feet depending on the environment. This opens up plenty of remote control and monitoring possibilities.
Adding WiFi capability allows an Arduino project to communicate over much greater distances for applications requiring wireless internet connectivity over local networks or the Internet of Things (IoT).
Several WiFi module boards are compatible with the Arduino Uno through UART serial communication:
With any of these WiFi modules connected to the Arduino's serial pins and configured with AT firmware, the board gains the ability to connect to local networks and send/receive data to/from servers on the internet. A broad range of IoT applications then become possible such as environmental monitoring, security cameras, smart appliances, and more.
As outlined earlier, the Arduino Uno's serial communication capabilities provide the foundational interface for adding wireless functionality through Bluetooth and WiFi modules. However, the single hardware serial port does present some limitations.
The Arduino IDE SoftwareSerial library helps work around this by enabling serial communication through certain digital pin pairs instead of just the dedicated RX/TX pins. This opens up the possibility of connecting multiple serial devices simultaneously.
Some key considerations with SoftwareSerial include:
For many projects, these limitations may be acceptable if not heavily serial data dependent. But some more robust options exist as well:
AltSoftSerial is an alternative to SoftwareSerial that supports pins 7-12 and has minor speed improvements through better interrupt handling. However, interrupts still cannot match hardware serial performance.
MultiSerial allows defining multiple hardware-based serial ports through pin remapping. This utilizes the secondary USART peripherals on boards like Mega2560 to truly match hardware serial speeds on multiple ports simultaneously. Additional AVR models are supported as well.
Finally, hardware serial port expanders integrate additional serial controllers to provide multiple physical serial ports through a bus like I2C/SPI. For example, the MCP2221 breakout gives two full duplex UART ports at 3.3-5V levels. These offer true hardware serial throughout without software limitations.
For most projects, SoftwareSerial suffices. However bandwidth-intensive applications may require an alternative approach to achieve robust parallel wireless communication.
While LCD modules are common visual outputs, Arduino is also well-suited for driving more advanced displays through compatible drivers and libraries. Here are a few other display technologies to consider:
Even complex graphical screens can be an option - the Arduino TFT library allows driving smaller SPI LCD panels while Adafruit_GFX enables general graphics on TFT/OLED displays. Advanced I/O and optional GPUs also unlock ST7735/ILI9341 controller support.
The right display choice depends on specific visibility needs versus size/power/cost factors for portable or embedded applications. But Arduino offers driver support for a wide range of innovative visual output technologies.
Crucial to many interactive projects is incorporating real-world inputs through various environmental and mechanical sensing capabilities. Fortunately, Arduino has a wealth of options in this regard as well:
Libraries provide abstraction from lower-level hardware details to easily code complex readings from a myriad of compatible inputs. Advanced functionality may also leverage protocol options like OneWire for temperature sensors or CANbus connectivity.
Overall Arduino's modular design enables tapping diverse sensing technologies to enrich almost any type of interactive invention or result in new applications inspired by the immense possibilities of human-environment interfacing.
While the Arduino platform excels at rapid prototyping, some more ambitious projects may require stepping beyond its default configuration with custom peripheral development as well. Here are some advanced capabilities to consider:
While the Arduino framework streamlines initial experimentation, ambitious builders can graduate to fully customized circuit design when the open-source ecosystem allows transcending board limitations. Creative applications may require pushing capabilities to their limits through these “advanced” techniques and disciplines.
A key advantage of the Arduino Uno's modular design is that it allows stacking multiple wireless technologies together to gain both local wireless control/interfacing along with long-range internet connectivity.
For example, a Bluetooth module can be used in conjunction with an ESP8266 or ESP32 WiFi module on the same Arduino board. This opens up possibilities like:
With multiple serial-interfaced modules connected, the Arduino's TX/RX pins can be wired to each device sequentially using simple resistor dividers or TX/RX pass-through connections. Software serial libraries help enable communication with peripherals on non-hardware serial pins as well.
Arduino projects commonly integrate LCD or TFT display screens controlled over the SPI or I2C bus for visual feedback and user interaction. Some common LCD/TFT display add-ons include:
Along with displays, common user interface components include:
Integrating any combination of compatible display and interface hardware allows Arduino projects to implement more sophisticated human-machine interaction beyond basic input/output pin readings.
For more advanced or complicated projects, alternative Arduino-compatible development boards and add-on shields provide additional features. Common options include:
Combined with other options discussed, these compatible development platforms and modular shield add-ons enable stretching the capability of Arduino projects well beyond the humble Uno while retaining overall familiarity and programming.
Regardless of specific hardware configuration, the Arduino Uno and its ecosystem run on the open-source Arduino IDE integrated development environment. The IDE provides a standard way to write and upload C/C++-based sketches to Arduino boards while facilitating their programming.
Libraries and code snippets available on the Arduino website help abstract hardware details and streamline the implementation of wireless communication, display control, sensor integration, and more within sketches. Popular examples include:
Additionally, the Arduino Bluetooth and WiFi101 Libraries provide cross-platform mobile and desktop apps for Bluetooth and WiFi connection testing respectively. This enables wireless configuration, data streaming, and remote interfacing without intermediary computers.
Alternative IDEs are also options - PlatformIO allows the use of Arduino-compatible boards but with additional features tailored for advanced IoT applications. MBed Studio focuses on ARM-based boards but supports many of the same wireless modules.
The only official Arduino Uno with built-in Bluetooth is the Arduino Uno WiFi Rev2. While the other Arduino Uno boards lack built-in wireless connectivity, its standardized protocols provide a strong foundation for adding Bluetooth, WiFi, and other wireless capabilities through affordable external modules. Serial, I2C, and SPI interfaces make boards like the Uno eminently compatible with a wide range of display, sensor, and peripheral expansion options as well.
By choosing the right combination of wireless modules, shields, displays, and sensors - and leveraging the extensive Arduino code libraries and IDE support - even beginner makers can create sophisticated interactive projects with both wireless control/monitoring and advanced human-machine interfacing capabilities. The Arduino platform continues to be one of the most accessible routes to bring wireless connectivity and IoT concepts within reach of all skill levels of makers and coders alike.
Still, need help? Contact Us: support@nextpcb.com
Need a PCB or PCBA quote? Quote now
|
Dimensions: (mm) |
|
|
Quantity: (pcs) |
|
|
Layers: 2 |
Thickness: 1.6 mm |
|
|
|

 Printed Circuit Boards
 Surface